
Troubleshooting Electrical Problems An Introduction to the Digital Multimeter
At the Cruisers’ University of the Annapolis Boat Show, I was asked to make a presentation on the use of a digital multi-meter to diagnose electrical issues on boats. During the class, it became clear that many were unfamiliar with the various ways a meter can be utilized in basic troubleshooting so I’m offering an introduction here. A later article will focus on more detailed and advanced troubleshooting.
A digital multimeter, or DMM for short, is a very versatile tool that can be used to measure electrical voltage, current, frequency, resistance, capacitance, connectivity, and more. On a typical cruising boat

that has both 12 (or 24) volt ship power from
batteries and 120 (and/or 240) volt shore power,
you likely have dozens of systems ranging from
bilge pumps to starter motors to (maybe)
watermakers and air conditioners. When things
aren’t working as expected, it’s time to break out
the DMM and start testing. This article will focus on
troubleshooting scenarios that will introduce you to
the fundamentals of measuring electrical systems
aboard. If you don’t currently own a meter, I
strongly recommend models from FLUKE such as
their Model 117. A good Fluke meter will set you
back about $150 but will last a lifetime and provide
outstandingly consistent measurements. Meters
from Prova (good) and Mastech (adequate) are
reasonable alternatives.
We’ll start with an introduction to the basic principles of electricity and then apply them to problems
that tend to creep on most boats.
A Quick Review of Basic Electrical Theory
Two basic laws explain the relationship between voltage or electromotive force (‘e’), current in amps (from Ampere’s courant intensité, ‘i’), power (watts, ‘w’), and resistance, (‘r’). Ohm’s Law tells us:
voltage (e) = current (i) X resistance (r)
This can also be written as one of the following:
e=i*r
i=e/r
r=e/i
If we know a voltage and either the resistance or the current, we can calculate the other value. This is especially important when calculating the permissible voltage drop in a circuit. It’s a chance to use something you might have learned in high school physics class and, if you’re like many people, promptly forgot!
The Power Formula states:
power (w) = voltage (e) X current (i).
Again, if we know that an appliance, like a space heater for example, is rated at 1500 watts and is plugged into a 120-volt outlet that it would draw 12.5 amps of current. When we combine these two formulas with a meter that can calculate the actual values. we are well on our way to diagnosing a device that isn’t operating according to its manufacturer’s specifications.
Measuring Volts, Amps, Ohms, Farads, and More:
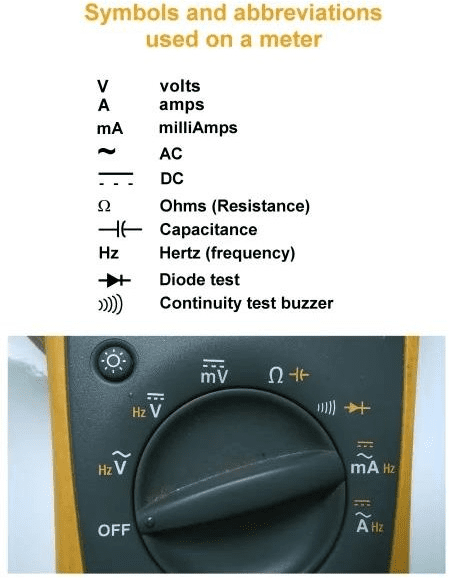
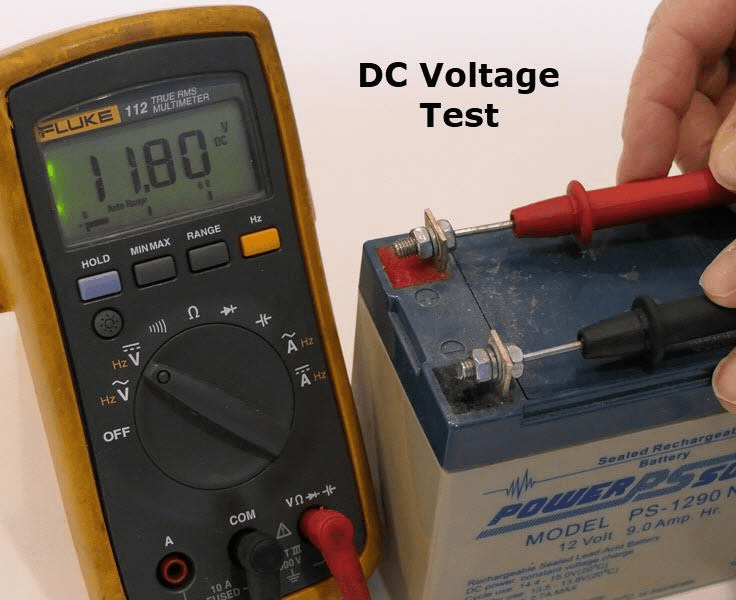
Voltage, or electromotive force, is measured in parallel; that is, we put our meter’s probes on both sides of the voltage source being measured. We set the meter to the DC Voltage setting, and put the positive (+) red probe on the positive terminal of the battery and the negative (-1) black probe on the negative terminal. Most boats under 50′ have 12-volt systems. When we say 12 volts, we mean the “nominal†voltage. This is important because a flooded lead acid (FLA) storage battery will show a voltage of approximately 12.7 volts (about 2.15/cell x 6 cells) when fully charged. When 50% discharged (the lowest we should take an FLA battery bank in normal use), the batteries would measure 12.2 volts. That 0.5 volts represents the entire range from 50% discharged
to fully charged, so having a good multi-meter that can accurately measure small voltage differences is critical to effective battery management and troubleshooting. In the DC voltage test image below the voltage we are seeing is the resting, no load voltage. That is, there is no load (such as a light bulb or radio) and no charging source (such as a solar panel or alternator). When voltage is used to determine state of charge of a battery, it is important to remember: charging and loads off; we want to measure the battery, not the power going into or out of it as well.
We measure AC voltages in parallel but be careful not to touch the any part of the circuit with your hands, as typical AC voltages on boats can be lethal.

While we measure voltage in PARALLEL, current is measured in SERIES. Low levels of current flow that are less than 10 amps, such as lights and VHF radios, can be measured directly with the meter probes, while larger loads, such as engine starters or air conditioners, require a clamp on style of meter. All DMM’s that can measure the flow of amps (current) in series have a fuse that protects them from over- current. The DMM manual will tell you which fuse to keep as a spare; we’ve all blown one now and then! For measuring heavy currents, you will need either a “clamp on†meter or a probe that connects
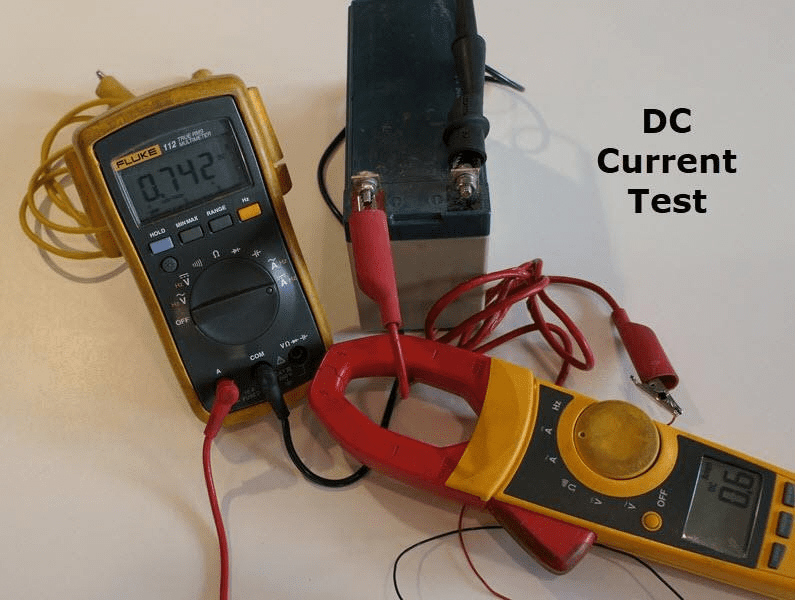
to your meter and clamps around a wire. There are many meters that meet this requirement; I am partial to the Chinese- made Mastech meters and the better Prova from Taiwan. The Flukes are wonderful but more than twice the cost, and for this application the accuracy you need from voltage measurement isn’t as important.
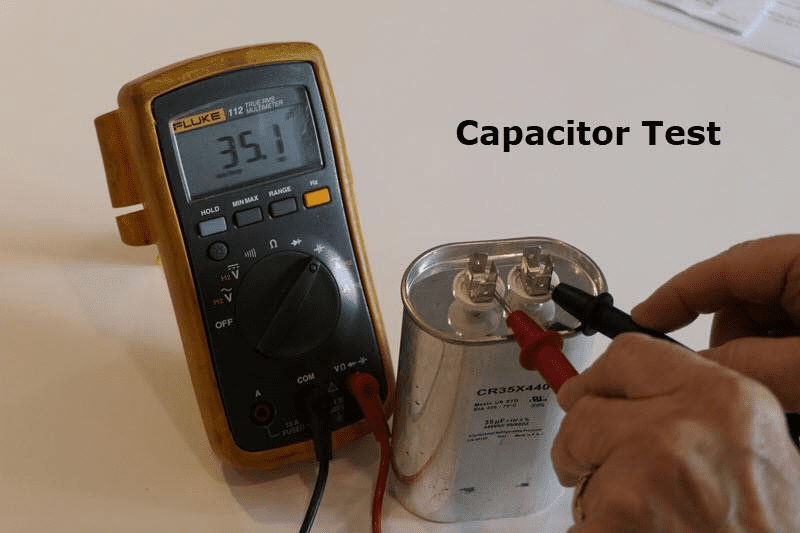
We measure resistance and capacitance (ohms and farads) in parallel, just as we do voltage. For example, a capacitor can be tested by setting the meter to the Capacitance Symbol ( -|(- ). The meter reading should match the value printed on the capacitor.
Multi-meters are also very good at testing electrical continuity in a circuit. Many have an audible beep as well as a meter reading. This makes it very easy to test light bulbs (not LED’s, they are tested with the Diode setting), fuses, and wires you can’t see completely. This is one of the most common uses of a meter and much more accurate than holding a fuse or light bulb up to the light and trying to see the filament!
Let’s look at some common troubleshooting
Problem 1: Starter won’t crank. You turn the key or push the start button and you hear nothing. Not a click, not a slow crank, nothing.
- First, use your voltmeter to check the voltage at the starting battery. You should have a built-in meter for that purpose but double check.
- Now check the voltage at the starter motor itself.
- Finally, check the voltage as the engine starter is engaged.
- If you have 12V or so at the battery and not the starter, look for a loose wire, probably the engine ground.
- If you have 10V or less you have a discharged battery, check your charging circuits (and look for a blown fuse in the shore side battery charger).
- If you have 12v at the starter and it drops below 9 when starting, your battery is probably dead.
- If you have a clamp on ammeter you can confirm this by verifying the current going (or, in this case, not going) to the starter motor by clamping onto the wire from the battery to the starter
Problem 2: VHF Radio won’t work but all other electronics do
- Check to confirm that there is no voltage getting to the radio by measuring at the back of the radio.
- Remove the fuse at the radio and, using the continuity function of the meter, confirm that the fuse is blown and replace it. Don’t laugh, it happens to everyone. And for some reason the blown fuse is the last place some people look. Remember, some fuses look good but aren’t; that’s what the meter is for.
Problem 3: Air Conditioner won’t Start
If you are lucky enough to have an AC on your boat (many cruisers find them necessary during summer months on the Chesapeake Bay), you know they can be finicky. While many repairs require a certified AC tech, a common failure is the loss of a start or run capacitor. They are easy to test using your multimeter. Refer to the previous image. Label and remove the wires and test the capacitor; it will either meet the labeled value or not. They can be purchased at hardware and plumbing stores that sell AC parts as well as at any AC supplier.
And many more. The digital multimeter is one of the most versatile tools you will have aboard and can be used to diagnose a huge range of electrical problems. This article is meant to introduce the electrical novice to the meter and its uses. Future articles will focus on advanced troubleshooting and other applications valuable to the cruising boater.
Comments on this article and other technical matters are welcomed in the Tech Talk Forum on the SSCA website at www.ssca.org. As a member, you can opt into this special interest forum by going to:
Member Profile-> Forums-> Forum Memberships-> Available Forums-> SSCA Tech Talk Forum.
Click the green icon to the right of the forum name to subscribe. When the pencil icon appears, click it to manage your forum preferences. If you have issues subscribing, contact Home Base at [email protected].

Author: Scott Berg has been sailing, racing and cruising for the past 50 years and has experience on a range of power and sailing vessels. Scott is the owner of Chardonnay Boatworks, a full-service marine repair and consulting company focusing on the repair and re-engineering of sail and motor yachts. He frequently lectures on marine electrical systems, electronics, and yacht systems and off shore sailing. Scott is a current member and past president of the Seven Seas Cruising Association (SSCA). He also holds a USCG 100T Masters license, an Amateur Extra Ham License, and currently lives on his 60’ Seaton Ketch, Chardonnay.
If you’ve found this article useful, you’ll find more similar information aimed directly at sailors/cruisers on the members-only portion of the SSCA website (www.ssca.org).